27 July 2017

Baby Sweaters - including a 40-year UFO

Once again, I've been busy and not updating the blog.  Of course, part of the reason is that I have been busy doing things - such as making or finishing three baby sweaters.  They are going to a "baby house" in FSU (not at the orphanages where I donate things through Mittens for Akkol, but another one) and I had fun with these.

First a sweater from one ball of Patons Classic Wool in "Commotion":


It was supposed to have a hood, but I didn't have enough yarn, even making the three-to-six months size, so gave it a placket and collar instead.  I had fun rummaging through my button box and debated several other options until I found the lone card with three purple "jewel" buttons.  Perfect!  Why shouldn't an orphan have special buttons?

Similarly the ones on this sweater, although they are not the only star-shaped ones I have:
 

The yarn is oddballs of (I think) Cleckheaton and a ball of Noro Kureyon, and I used all of the blue and the Kureyon but have a bit of the green left.  It's the Super-Natural Stripes Sweater in about 18 months size.  I received a lot of compliments about it, including when I was knitting while waiting for the annual Om Street to begin (you can see me at it in the background of picture #107).  The colours show up much better here - they really are bright, and one friend said quite classic:
It's almost hard to give that one away, but I have no use for it and some child will be warm.

Finally, a sweater that I had very little to do with.  You see, my mother found an old knitting bag with pieces of two sweaters in it.  She made them when my brother was an infant.  They are nicely done but were never put together.  Mom gave me permission to finish and donate them.  I had time to do only one for this shipment, since the woman going to visit the baby house is leaving earlier than we expected.  I chose the one that seemed to be more complete:

At the top is a back with two fronts attached at the shoulders.  We're not sure what the middle piece is; I guessed a hood of some sort.  And the two sleeves below.  Since there was no other yarn and of course no instructions, I decided to use my best guesses, and to unravel the hood piece for yarn to finish the sweater.

First, set in the sleeves and sew side and underarm seams:

The fronts have no buttonholes and just touch, so I wonder if they are supposed to have a zipper?  I don't have one, and I do have a lot of buttons, and I've heard that buttoned sweaters are more popular in FSU countries.  How to adapt?  I decide to knit on another six stitches in the same 1:1 ribbing, and attach it as I go.  Like this:
 
For one side, I skip attaching every so often, to create buttonholes.

Then to finish the neckline, I added a ribbed collar:

And of course once some buttons were sewn on (the backside is very much prettier than the front, although the white side would have been fine too), it's a cute little cardigan!


So decades after it was first knitted for a then-little boy, hopefully it will keep some other little child warm.  It's not the first time I've put together a decades-old UFO for my mother, and I said it's proof that dislike of sewing-together is genetic!

16 June 2017

Historical Cooking Report - The Delineator Cookbook

I need to do some catching-up on both cooking attempts and reporting.  I've found a new website about 18th Century things, including cooking, thanks to another blog I read, Savoring the Past.  So the rabbit hole of the Interwebs is working its wiles!

This month I had plans to cook with a young cook of my acquaintance, one of my honorary nieces.  She wanted to do a menu from an old cookbook of mine which I believe was created to teach new wives how to do simple cooking and manage their homes.  I have several of these, some of which are very similar and turned out to be by branches of the same company, and I chose this one because I thought the name is fun:


Research told me that The Delineator was a women's magazine of the 19th and early 20th Centuries. It originally focused only on sewing patterns and related needlework, since it was published by The Butterick Company, but expanded to include articles about home decor, recipes, and fiction by popular authors.  As was common, the company collected some of its work into books such as this one, which was published in 1929.
 
We looked through and Z chose this menu, I think because it includes baked apples, which she loves:


The original plan was to make the menu as written.  We ended up changing it around a bit for several reasons, including:

  1. Nobody in her family likes green peas, so we decided to substitute broccoli.
  2. Then her mother found zucchini at the grocery store and bought it instead.
  3. They also don't like raisins, and there was no reason to just use nuts in the apples.
  4. The temperature was in the 90s(F) on the day we were cooking.
  5. I ended up running late from a tour (see photo below) and we didn't have as much time as we'd hoped because everybody was hungry.
The cookbook doesn't tell you where to find the recipes, so we had to hunt.  There wasn't a rice croquettes recipe, so I made it up from the other recipes for croquettes.  Upon reflection, I should have used half the rice, because it wasn't stuck together well enough.  They precooked the rice, which saved quite a bit of time once I arrived.

Process:
  • Make a medium white sauce (recipe in book), mix with rice, set in refrigerator to cool.
  • Cut apples into pieces, removing cores, and put into bowls.  Instead of baking them we decided to use the microwave.  Apple pieces were sprinkled with cinnamon and a pinch of cloves.
  • Slice zucchini, layer into oiled dish, sprinkling with dried herbs.  We discussed several options, and while marjoram is my favourite, Z selected basil.  We then microwave-steamed them.  [NB: Zucchini was not mentioned at all in the cookbook.]
  • Make a thin white sauce and stir in lots of shredded cheddar cheese.
  • Form rice croquette mixture into patties and pan-fry.  It was much too hot to properly deep-fry them (form, chill again, flour-egg-breadcrumbs, fry) and since they didn't stick together well (more white sauce or less rice needed), it was sort of a crispy fried rice patty.
  • Instead of tomato soup (per recipe, heat broth - we were going to use vegetable - and stir in chopped vegetables, then heat through) we decided to just slice the tomatoes to salad.
So the final menu ended up being:
Sliced Tomatoes
Steamed Zucchini with Herbs
Pan-fried Rice Patties with Cheese Sauce
Baked Apples
Strawberries

Overall, the verdict was that the food was tasty, and suited to the heat of the day.  I'd bought strawberries at a local farmers' market and because I was leaving town the next day brought them over to share.  I didn't take photos because we were busy, and people were hungry!

Z enjoyed the experience and loved making the white sauces.  We stirred flour and butter together over low heat, and when they made a paste stirred in milk.  For the medium sauce it was two tablespoons of each to a cup of milk, and for the thin sauce we used one tablespoon of each.  When you add the milk it gets both clumpy and thin for a minute, then the paste dissolves into it and for a few minutes it seems you are just stirring warm milk and nothing happens.  You have to keep stirring so it does not scorch.  Then all of a sudden it starts to thicken and you pay attention!

We're planning another cooking event and I suggested a menu with "corn oysters" in it because they keep kosher and I thought her father would be amused.  These are really corn fritters with a funny name, and if there is fresh corn in early July, we'll do it.

The tour that delayed me was one scheduled by MakeHartford on the replicas of The NiƱa  and The Pinta that had anchored in Hartford for a week.  It was really interesting to be aboard and the First Mate of one ship gave us a guided tour.  If they are near you, go aboard and see what it was really like (but the modern ships are much cleaner and less smelly!) for the sailors on Columbus' voyages.
Picture I took of the ships while waiting for
all of the tour attendees to arrive.

22 May 2017

Busy, Busy Yarny Months

First, I did miss the monthly "Cooking From History" post, because while I planned to do it, I got very busy with work and deadlines and didn't take the time to cook.  So I am going to double up either this month or next, and in the meantime you can read about someone else's cooking adventure here.

I participated in both the opening reception and the meet-the-artists talks (and following potluck) for the Paper Possibilities 2017 exhibit, and really like how my entries are exhibited:
The colours of the hanging piece really pop against
the colours of the wall.
I've also been working madly on the annual Knitting for Grads at orphanages in Kazahkstan by the Mittens for Akkol knitters, adding a number of from-stash scarves and hats to the shipment in addition to what I committed to make for various graduates:
Extra grad set - a sweater I made for me but didn't wear,
added hat and scarf.  Yes, the body is entrelac.
This boy asked for red, and the "mom" making his accessories asked if I
would add a bit of blue because she added some, so I added a bit.
Closeup of the stitches - crocheted with knitted ribbing
Several people thought of doing "RAAM" from Berroco -
here's mine, in Patons Classic Wool red.  Not a great photo.

At the end, I did have one failure, when it was clear that I would not finish the final sweater.  However, I found one online that the store promised to ship by deadline, and it arrived in time, so - whew!  I saw a lot of cute sweaters but they need to be all-wool (or other animal fiber - mine include wool-alpaca or wool-mohair blends) and those are in slim supply this time of year.  I'll finish the other sweater eventually, and either a grad next year will want the colour and be about the right size, or it will be an extra.

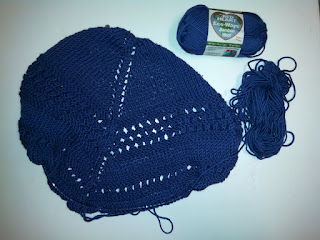
Now I am enjoying knitting for me.  I joined a KAL (Knit A-Long) and am doing two shawls: one following the pattern except in a lighter yarn with a smaller-sized needle, partly because the finished shawl looks huge and I am not.  I am using stash yarn, of course, and happily found one by the hosting yarn company in a really pretty blue:


The other uses some yarn of theirs in three colours (the third will be in Section 4) and some from another company in a very pretty silver, and follows the pattern except for making a closed spine.  I'd envisioned using these yarns to make a shawl to wear to summer concerts in the park, with stripes of reflective yarn to add safety when I walk home from the bus at night.

The KAL is up to Section 3 of the pattern and a lot of people are knitting ahead.  I made sure to get a photo after each stage.  After this I'll get back to finishing some WIP/UFO shawls.

I'm also doing a couple of "idiot scarves" (plain garter stitch in non-plain yarns) to donate to a collection or other for shelters.  These are handy carry-around items.  I finished one this weekend - they do go fast! - and it is pretty long, almost seven feet!  I'm going to do more with the yarn and now I know I can make them wider; this one is about 5½" but thick (I used the yarn doubled) so it should be plenty warm for someone.  More using up of stash, in addition to what I am donating to charity and selling on eBay.

I do have one baby blanket to finish, but the baby isn't born yet so I have ..... about three weeks.  I guess I should get that one started, eh?

01 May 2017

Another UFO Blog Hop

A couple months ago, the UFO group I joined this year did a blog hop so that people could post about progress on their items.  Although I have not made much progress on the shawls that I announced as my UFOs for the year, I did finish two other items.

At MakeHartford we have a Paper Artist Gathering group which I am part of mostly because I was part of the original Geometric Origami Club that grew into the current group.  And somehow, I was talked into contributing to a group exhibit that opens on May 6th at the Farmington Valley Art Center.  Titled "Paper Possibilities 2017: Exploring a Modest Medium" it shows all different types of art created from paper.

When people were talking about the exhibit, I mentioned some UFOs I had from a workshop on creating altered books from the lamentably gone (the artist moved to Virginia!) from Hartford, Studio N111.  In this workshop, we took books and learned about cutting and rearranging and folding and all kinds of options to decorate them.


Although I did a little work after the workshop, this is where they were, and had been for quite a long time:


The open book at the left, "A Road to Hope", is about a couple who helped to create a home for families near a cancer treatment center.  I ended up not doing more to it this time (if it doesn't sell, and I don't expect it to, I may do more and enter V1.2 in next year's exhibit) and didn't take pictures of the little that I did do, but I did more work on the other item.

That book was a young adult paperback, rather battered.  I removed (and recycled) the cover, and began to fold the pages into the same three-fold pattern, but alternating which corner I used to start.  So the shape formed as shown.

When I went back to it to finish the piece for the exhibit, I envisioned something mostly painted white and pale yellow, with maybe a touch of pink, and some deeper blue and purple circling it at angles.  I found a crystal dangle in a shape that echoes the one that is forming, and wanted to add it to add some interest to what I thought would be an unimpressive piece, especially compared to other artworks in the exhibit.  To attach a hanging loop and the crystal, I envisioned satin cord monkey's fist knots at each end, coordinating with the blue or purple or even both.

Of course that didn't happen.  As I mentioned in yesterday's post about randomness, a friend had counseled that sometimes art takes its own direction and doesn't end up as planned.  Without a lot of time to struggle, I wasn't going to fight the art.

First, I finished folding all the pages, and I noticed that the pages that had been exposed were slightly but noticeably yellowed.  This happens with the type of cheap paper often used in paperback books, and I realized that not only would it require a lot of paint to cover to get the white background I was envisioning, but the pages were going to continue to yellow as time passes.  So I decided to make that part of the art.

I'd obtained a set of pearlescent watercolours, and used them to add tints to the piece, focusing on yellow, orange, rust, and two shades of green:
You can see very clearly the newly-folded pages below, and the sun-tinted ones above.
I did more than one pass, some more watery and others drier, to get different depth of colour.  Then I decided that the monkey's fist knots wouldn't quite work, in addition to not having any beads or balls at home large enough to act as a base, and not having time to shop for any before the piece needed to be delivered.  So I took some wool yarn that seemed to coordinate with the paper colour and two buttons scrounged from my stash (I wanted two of the ceramic one, which seemed to coordinate best without adding more colour to the piece, but only had one, and so relaxed my stress of symmetry) to create a tasseled hanger.
Sorry it's not focused.  JHB Collection on left, something artsy on the right.
The darker, thinner button went on the top with the idea that it would be less visible when the piece is hung.  I didn't fasten the cord into the paper piece; it's held by tension and the curve of the spine caused by the folding.

Here are a couple quick pictures taken when I dropped off the piece:


Although it's not what I had envisioned, I like the end result.  The colours are much more visible to the naked eye than they photograph.  You still see that it was a book (one of the other artists wanted assurance that I would not obliterate the words, and I told her that was why I selected watercolours) but it has turned into something almost organic.  The tassel is at the top, slightly off-center from where the hanging occurs, and not visible in these photos.  I'll try to get one at the opening on Saturday and add it or link to another post.

Now that you've read the story of my UFO, check out what some of the other artists in this month's blogroll have been finishing:


Karen Williams, Baublicious
Francie Broadie,  FAB
Christine Van Dyke Altmiller, One Kiss Creations
Kim Dworak, CianciBlue
Liz Hart, Treetop Life
Amy Severino, Amy Beads
Cynthia Machata, Antiquity Travelers
Hope Smitherman, Crafty Hope
Christi Carter, Sweetpea Path
Bobbie Rafferty, Beadsong Jewelry

30 April 2017

Bunnies and Drunkards and Random Paths

This past week, three things came together in a random way that highlight the randomness in my life and some of the paths I have taken.

First, I was finishing some semi-abandoned art pieces for an exhibit opening next weekend.  I will post more about them tomorrow as part of a "UFO Blogroll", but as I was working on one I mentioned to a friend who is also an artist that I had a plan for the piece, and I wondered if it would come out as I envisioned.  My friend, more experienced in producing art, counseled that sometimes you just have to let the piece tell you what it's going to be.  You can read tomorrow how that worked out.

Second, I was able to get a ticket to hear Franklin Habit speak on the topic of "Follow Your Bunny: The Creative Life from A to Q."  He is worth hearing no matter what the subject, but this one applies to almost any artist, not just one in the fiber arts.  Although the promotion said it would address what to do "if your creative well runs dry?", he spoke more to allowing creativity to flow and occasionally meandering off the expected path if something sufficiently interesting crosses it.
Gratuitous fan picture taken from well back in the auditorium.
Third, whilst looking for something (the best way to find other things you didn't know or remember you'd lost) I found my copy of The Drunkard's Path: How Randomness Rules Our Lives.  The fact that I have had this for a long time without finishing it was underscored to me by the fact that it came from Borders Books, which ceased operations in 2011.

The author writes about chaos theory and randomness and how things that appear to be random often are not as random as they appear.  I brought the book as my current trip-reading, and have plunged in to the discussion of how intuition and logic analyze experience to create innate decision trees.  More to come as I work my way through the chapters.

So now I am left to ponder whether it's mere coincidence that these three events, seemingly random yet about randomness, occurred in the same week.  Serendipity?  Cosmic message?  Or just a week in which three random threads happened to reach a crossroads, and not really as random as they seem?

I have a book to read, and yarn to play with, and another blog post to prepare so I can post it tomorrow.  Maybe a drunk (or not) bunny will cross my path and I'll end up doing something else.

01 April 2017

Martha Washington Cooking in March

No fooling, I did cook from a historical cookbook in March - I just didn't get around to writing the post.  So here it is!  I thought of pulling out Apicius for the Ides of March, then I found the Martha Washington cookbook I'd originally intended to use on President's Day.  So I thought I'd see what she has to offer.  Since I've given up wheaten goods for Lent, I had to ignore all the recipes for baked items, of course, and figure out how to do a balanced meal from the ones included in the cookbook.

As with Thomas Jefferson's cookbook, there were few recipes for vegetables.  Most were how to grow the vegetable, or how to preserve it.
   

Looking at the list, I decided to make "sparragus" (asparagus) which is plentiful in March, and use the Seasonal Pickle from my CSA, which is a lacto-fermented collection of whatever odds and ends they have when they are making that particular batch of pickle.  This one includes carrots, various greens, and some onion.

For the meat I am using fish, and although the recipe is for trout, that's surprisingly expensive, so I went with a filet of tuna from the freezer. Needing a starch, and not being able to bake bread or biscuits, I found a steamed pudding that uses oats instead of wheat flour:
I used steel-cut oats, and instead of letting it simmer all night, pulled out my small crockpot, which I have used to cook steel-cut oatmeal in the past.
I used "high" to heat a pint of milk, then following the 4:1 ratio on the carton of oats, I added a half-cup of steel-cut oats.  After leaving it to cook on low overnight, it was cooked but still milky.


I chopped up a bunch of spinach and about half a bunch of flat-leaved parsley, and stirred them into the oats in the crockpot along with an egg.  I debated whether to use a second egg; it's hard to guess sizes of eggs then versus now, and I generally assume the eggs are smaller, so making a half-recipe meant I could use one large egg instead.

Once this was mixed, I took some muslin and wetted it, then rubbed on cornmeal.  I placed it in a bowl to make filling it with the pudding mixture easier.
 

I tied off the pudding and set it into a pot of simmering water, tying the string to a wooden spoon placed over the top to make it easier to fish out.  Then I went away for an hour or so, checking periodically and adding water once or twice.
The asparagus was just steamed a bit, that was easy.  For the fish, I followed the recipe on "How to Boyle a Trout", although using a single tuna steak instead of a while fish "cut in pieces" - fillets? steaks?  My guess would be the former, but I was working from my freezer.

This is white wine (from a local winery, plus a splash of champagne left from making New Year's celebratory cupcakes), a lump of butter, a bit of minced ginger, and a sprig of rosemary from my kitchen pots.  I thought it might be a bit large, but I like rosemary, so took a chance.

Since the tuna steak was a bit thick, I cooked it for a few minutes, then turned it and cooked the other side until the piece was done to my liking.


At this point, I took out the pudding, unwrapped it, and arranged the plate:
Seasonal pickle is top left, and simply steamed asparagus at top right.  I chose thin stalks and had to cut them in half due to the size of the pan.  The pudding is to the left of the fish, and I thought another egg might have been a good idea because it was somewhat falling apart.  Of course, I'd had to guess at proportions of the "hearbes" to oats, and was trying to not put in too many so the oats would also keep it together.

For the fish, I think next time I will add a bit more ginger and a bit less rosemary.  I love it, but that was definitely too much and starting to overwhelm the dish.  The pickle added a welcome tang to the overall dish.  Definitely a meal I'll try again, with adjustments.

Since there was quite a lot of pudding, I put it into the refrigerator.  Cold, it was much more cohesive.  Warmed, it made a nice breakfast with a bit more pickle on the side.
I've already decided on the April cookbook, and will work on getting that report posted more promptly after cooking.  In the meantime, it's an icy day outside, and I might try the fish again as a nice warming meal.  No fooling!

15 March 2017

Pi Day Cookery

Many geeky people celebrate March 14th as "Pi Day", because the number begins 3.14.  Many of my friends talked about the pies they were making for lunch or supper, ranging from simple names or descriptions to photos of pies with "Ļ€" cut into the top crust, or with the number cut or stamped around the border.

Because we were having a bit of weather here (Blizzard Stella, or whatever it was called), I continued my pantry cooking plans.  Having given up gluten for Lent meant I could not do my usual quick pie crust and bake something yummy.  I didn't think to pick up potatoes, or a Shepherd's Pie would be the easy answer.  Then I realized I've had some spaghetti squash waiting to be used, so a Spaghetti Squash Pie it would be!

First. baking the squash.  Into the oven in a baking tray with some water in it at 350°F.  Then a colleague needed help and it was almost two hours before I got back to them, which was more time than needed but luckily they didn't explode or get mushy.  This was on Monday, and I had some with a quick tomato sauce and the last couple slices of provolone from an Italian cheese tray.  Not bad.  The rest I seeded and fluffed and put into the refrigerator for Tuesday, along with a package of tomatoes from the freezer, so they would have time to thaw.  It happened to be the package from which I have taken tomatoes for other recipes, so was a bit under two cups of roasted tomatoes.

There seemed to be a pinhole in the bag, because when it thawed some of the juice ran out.  I didn't mind because this left the pulp and saved me having to simmer it to concentrate the sauce.

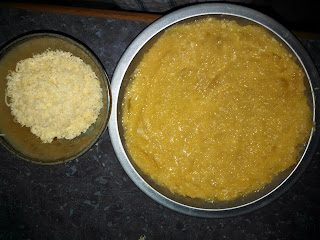
Before cooking, I did a quick bit of research for vegetarian spaghetti pies, to get some idea of the proportions of egg and so forth.  Most agree on two eggs although some say you can use more.  This was my starting point for the dish:
The cheese is a local product, a hard, aged cheese that I thought would sub well for Parmesan: Niantic Abbey from Sankow's Beaver Brook Farm.  It has been in the 'fridge since I bought it at a farmers' market last summer, and I decided to use it so I can get some fresh this year.  I had to carve off the rind, which had gotten a bit moldy, but the cheese was fine.
I grated it on the shreds side of my new(ish) box grater.  When I was almost moving last year, I bought it (on sale for $4.99!) for my temporary apartment.  After I returned, I decided it was time to retire (recycle) my old box grater, which was not stainless steel and hard to clean.  This one is a treat!

First I shredded about a quarter cup of cheese to go into the crust, then finished the rest and set it aside for later.  I guessed at how much spaghetti squash would be equivalent to the pasta used in the recipes.  Then I mixed these with my hands, patted and spread it in the pie pan which I had oiled, and put it into the oven for about ten minutes while I made the sauce.

For the sauce, I sliced the scallions (left from St. David's Day) and sauteed them in a bit of olive oil with some minced garlic.  Then I added herbs and spices, including basil from my CSA which I had dried to keep through the winter, and some oregano, fennel seeds, hot pepper flakes, a bit of parsley.
I cooked this together for about a minute, then added the tomatoes.  I pulled out the rack with the crust on it, and spread the sauce in it.  Then I baked this for about twenty more minutes.

After that, I spread on the rest of the shredded cheese.  I thought I'd have some for later, but nope!  It's hard to see in the lefthand photo, but the crust was getting solid and crusty next to the pie pan.
 

After ten minutes, it was toasty, and the cheese had released oil.
I let the pie sit for a few minutes and the oil was absorbed.  Letting something like this sit for a few minutes is necessary so that it will slice neatly:
 
It's tasty, and the intensity of the roasted tomatoes and the intensity of the cheese play well with each other.  The other flavours are very subtle by comparison, and if I had not been hungry I would have played with the herbs a bit more.  The onion cooked down and was quite mellow.

And now I have pie to eat for lunch all week!

If you want to know how much snow we got, this picture shows the same view just after dawn, when it had been snowing for a few hours already, and just before sunset:
There had been no snow in this area the night before.  Total in my town was 14.5 inches, officially.